Remote UI
Home Assistant Remote UI allows you to connect to your Home Assistant instance from outside of your home network. By default, remote access is not possible. You need to enable it. Once enabled, Home Assistant generates a security certificate for secure communication and provides you with a URL. You can then use this URL to access your Home Assistant while away from home.
To enable remote control
-
In Home Assistant, go to Settings > Home Assistant Cloud.
-
Make sure you are logged in to Home Assistant Cloud.
- If you only just logged in for the first time, you might see a message "Remote control is being prepared. We will notify you when it's ready.".
- In this case, wait a few minutes and refresh the page.
-
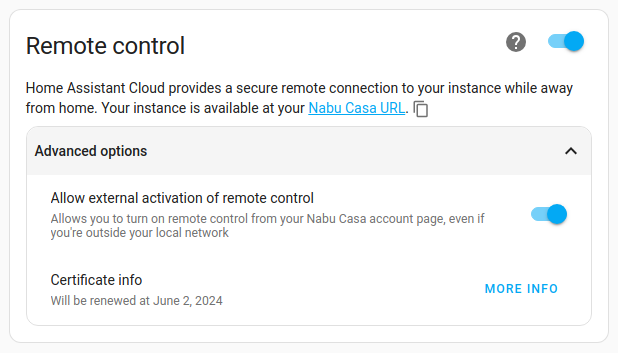
Under Remote control, enable the toggle.

- The first time you enable it, Home Assistant Cloud will have to generate and validate the certificate. This can take up to 60 seconds.
- The link shown here is the link that you need to use when connecting remotely to your instance.
-
This URL is only accessible if your local instance is connected to the remote UI server.
- By default, Home Assistant maintains a connection if remote connections are enabled.
- When not connected, the remote URL will not be accessible.
- If you want to be able to activate remote access from outside your network, enable Allow external activation of remote control.

-
Congratulations! you can now access your Home Assistant from outside your home network using a URL.
To activate remote control from outside your network
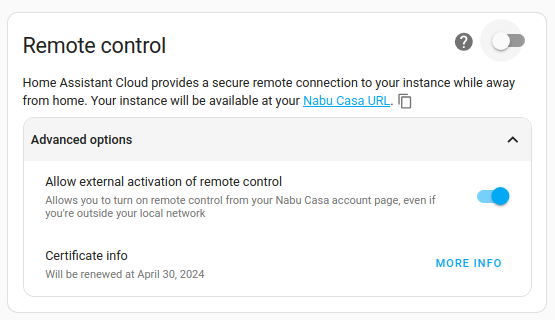
If you are away from home and want to access your Home Assistant, but the remote control on your instance is disabled (as shown below), you can activate remote control from your account page.

Activating remote control from outside your network only works if under Settings > Home Assistant Cloud you previously enabled Allow external activation of remote control (see steps above under To enable remote control).
-
Login to your Nabu Casa account page.
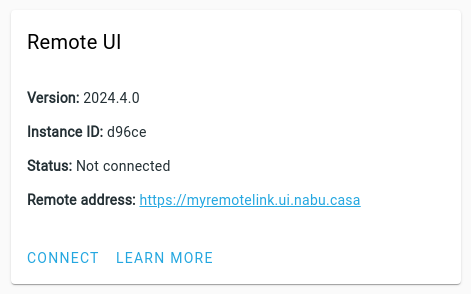
- If your instance is not connected, the status under Remote UI is shown as Not connected.
-
To connect remotely, select Connect.

-
You can now connect to your Home Assistant using the Remote address URL.
Using a custom domain
If you own your own domain (like example.com), you might want to use a subdomain of that domain name (like home.example.com) to have a familiar URL to your instance, in addition to the one we provide.
To use your own domain name, first log in to the Nabu Casa account page. Then look for the "Add Custom Domain" card.
In the "Add Custom Domain" card, write the subdomain you would like to start using (like home.example.com) and select "Next" to start the process.
Once the configuration is complete, the certificate needs to be regenerated and validated with both your custom domain name and the one we previously provided. To do this, restart your Home Assistant instance. This feature requires Home Assistant 2023.9.0 or later.
Automating availability of the remote UI
As a Home Assistant user, you might like to automate things. We understand! The cloud component exposes two service to enable and disable the remote connection: cloud/remote_connect and cloud/remote_disconnect. That way you can turn on the remote connection only when you leave the house and need it.
Ingress
Add-ons which support Ingress can be accessed via Home Assistant Cloud. Because they are served via the Home Assistant UI, they benefit from the same end-to-end encryption and local authentication as the Home Assistant frontend.
How it works
The remote UI encrypts all communication between your browser and your local instance. Encryption is provided by a Let's Encrypt certificate. Under the hood, your local Home Assistant instance is connected to one of our custom built UI proxy servers. Our UI proxy servers operate at the TCP level and will forward all encrypted data to the local instance.
Routing is made possible by the Server Name Indication (SNI) extension on the TLS handshake. It contains the information for which hostname an incoming request is destined, and we forward this information to the matching local instance. To be able to route multiple simultaneous requests, all data will be routed via a TCP multiplexer. The local Home Assistant instance will receive the TCP packets, demultiplex them, decrypt them with the SSL certificate and forward them to the HTTP component.
The source code is available on GitHub:
- SniTun - End-to-End encryption with SNI proxy on top of a TCP multiplexer
- hass-nabucasa - Cloud integration in Home Assistant
Caveats
We are currently not forwarding the IP address of the incoming request. Because of this, we are unable to support Home Assistant instances that have configured 127.0.0.1 or ::1 as trusted networks or proxies. It also means that if you use IP bans, the remote connection will be banned as a whole instead of just the address from which the incorrect passwords were entered. We are currently exploring a solution for this issue.
Security
Making a secure solution is a challenge. In this section, we want to discuss the things we do to improve security, what weaknesses there are in our approach, and how we plan to solve them.
Our approach is secure because:
- All data is encrypted between your browser and your local instance. The local instance has generated and owns the certificate. Therefore, only the local instance will be able to decrypt the incoming traffic.
- Once a user is communicating with their Home Assistant instance, they will have to log in with their local credentials. These credentials are only stored locally and cannot be impersonated by anyone.
Before we talk about weaknesses, know that we will never abuse any weakness unless forced by a government entity. Our approach has one single weakness that is unavoidable: since we own the domain that hosts the remote connection, we are able to issue our own certificate and man-in-the-middle attack (MITM) remote connections. This would allow us to see all data passing through, including authentication tokens.
It is not going to be possible to avoid MITM attacks. However, it is possible to spot them:
- You can validate that there is no MITM happening by making sure that the certificate fingerprints matches with the local instance certificate fingerprint. You can find the fingerprint by looking at the certificate info in the cloud configuration page inside Home Assistant.
- Let's Encrypt takes part of the experimental internet security standard Certificate Transparency (CT). The standard creates a system of public logs that will record all certificates issued, allowing local Home Assistant instances to spot if their certificate is being impersonated. We're exploring how to automatically audit this on the local instance.
Insecure versions
Home Assistant instances known to have security issues to connect to the Cloud are blocked from using the remote UI feature. This helps in securing your Home Assistant instance.
Updating your Home Assistant instance to a secure version will allow it to be accessible via Remote UI once again.
If you cannot update to the latest version of Home Assistant right now and are certain that your instance is safe, you can disable this protection. You do this at your own risk! You can manage this on your Nabu Casa account page.
Please note, such a block only affects the remote UI feature, all other Cloud features will keep functioning normally. Amazon Alexa, Google Assistant, TTS and Webhooks will continue to work during a security block.
If this protection has been manually disabled and the Home Assistant Team has identified a new insecure version, it will automatically re-enable the protection by itself. This ensures you are protected if new security issues are found in the future, as quickly as possible.
Currently blocked versions of Home Assistant:
- Home Assistant Core 2021.1.4 and older. More information.